In t ball , how do you teach a 5 year old the Ready Position? Here is some hints to teach the ready position for t ball and youth baseball. I am tired of hearing coaches and parents screaming down and ready, and the kids put there hands on their knees because they have been taught wrong.
Fix most common hitting faults
with 1 or 2 of the RIGHT adjustments
In coaching tee ball probably the first thing to do is teach the Ready position.
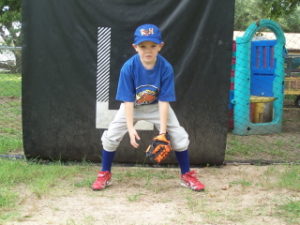
1. Feet spread a little wider than shoulders This gives balance and ability to move any direction
2. Balance on the balls of your feet:not the heels. Sometimes when the kids are getting a little disinterested I may state (loudly of course) On Your Toes! This will wake them up and get them in position
3. Butt Down! Most important..if your butt is down the knees bend and the hands go down with them. This gives balance.
4. Hands in Front Two hands(I like to have kids (the first few practices) practice a few ground balls catching them in front without a glove to get them used to catching with two hands and then try it with the glove on.
5. Eyes on the Ball
Cant catch what you can’t see. Catch the ball in front with two hands Safety too. If there is a bad hop your hands will move to protect and catch.
How do I Coach and teach the ready position? Lets keep it simple.. It would be best to have the kids divided into at least 2, preferably more groups (groups of 4 is good).  This gives the most repetition and is the most efficient use of time. It will also keep them from getting bored to quickly. Pretty much every drill in t ball should be done in groups for these reasons.
T Ball Ready Position Drill
Demonstrate first, then walk thru it with players a few times, then let them try on their own with the Ready! command spoken by you. You want the team to get faster and quick reaction in the next few practices. The Goal is.. when you State Ready! The players immediately focus and get in ready position at any time throughout the season.
This drill has extensions which means you can start the original ready drill and go thru quickly(even one time), or bypass altogether.
Ready Position Drill
1. Speak READY! very loud. Players should spread feet a little, butt down, hands out in front.
2. Toss a few ground balls without gloves
3. Toss a few ground balls with gloves
Move to next station or start Eyes on the ball extension
Eyes on the Ball Drill Extension
4. GET IN FRONT OF THE BALL! Now let’s get them moving. Remember Eyes on the Ball? Toss a few balls to either side of the player and get them to move in front of the ball. (Some coaches like to use the belly button for this but I still like using the eyes and it has been effective for my coaching)
Charge Drill Extension
5. CHARGE! With this command you should toss some slow rollers and get the players moving in to the ball. It will happen I guarantee you.
A Special Note for Parents: I started working with my latest T baller during winter in the house. Showed him relaxed position(which was hands on knees) and then Ready Position. We would practice this just a few times. I would say Relax! and he would go in to the relaxed position..I would say Ready! and hands come up and butt goes down. Then we would catch some tennis balls without a glove..then we would do a few with the glove. You will have to help them a few times with this but if you do this a few times a week…When the weather is nice enough to go outside you can do the above drills. At that first practice when Coach states Everybody Ready! You will be very proud.
The tee ball Ready Position is the beginning of coaching youth baseball.

